Webinar Transcript
Avantika: Hello and welcome to this product demo webinar by WebEngage. My name is Avantika Pandey. I’m the community manager at WebEngage and the mediator for today’s webinar. Before we get started, here are a few housekeeping topics. First, you’ll be on the listen-only mode. Second, we’ll be recording the session and the recording will be made available to you in couple of days. Third, we’ll have a Q&A session at the end of the webinar but if you have any query during the session, you can put your questions in the comment box below, and we’ll address them later.
Now, for those who don’t know, WebEngage is a marketing cloud for consumer businesses. More than 42,000 online businesses have automated their end-to-end communication across users’ life cycle through our platform. We enable the B2C brands to engage, retain, & grow their customer base via channels like email, SMS, web message, InApp and web push notification.
In today’s webinar, we’ll discuss how you can set up as well as start sending web push notifications via WebEngage in no time. And to explain you how, we have Lithin Thomas who’s the senior software engineer of WebEngage, and how we like to call him, the web push top gun. Over to you Lithin.
Lithin: Hi and good day to everyone joining in. This is the agenda for today. So, we’ll run down through how our web push works, right from subscription, you subscribing in to sending a push notification. Then, we’ll cover, “How do you configure, how do you start using web push on WebEngage?” Before you actually can send a single push notification, you have to configure something on WebEngage. So we’ll walk you through that, the options that we provide, and the basic configuration that needs to be done. And then we move on to creating campaigns via WebEngage and we’ll discuss what is possible, what all you can show with a web push, and also what’s possible for targeting. And then we’ll explain the reasons why WebEngage is the best fit for sending out or engaging with web push. Before we begin, this is part two of our web push series. The session one of this series covered the basics like, “What is a Web Push Notification?”
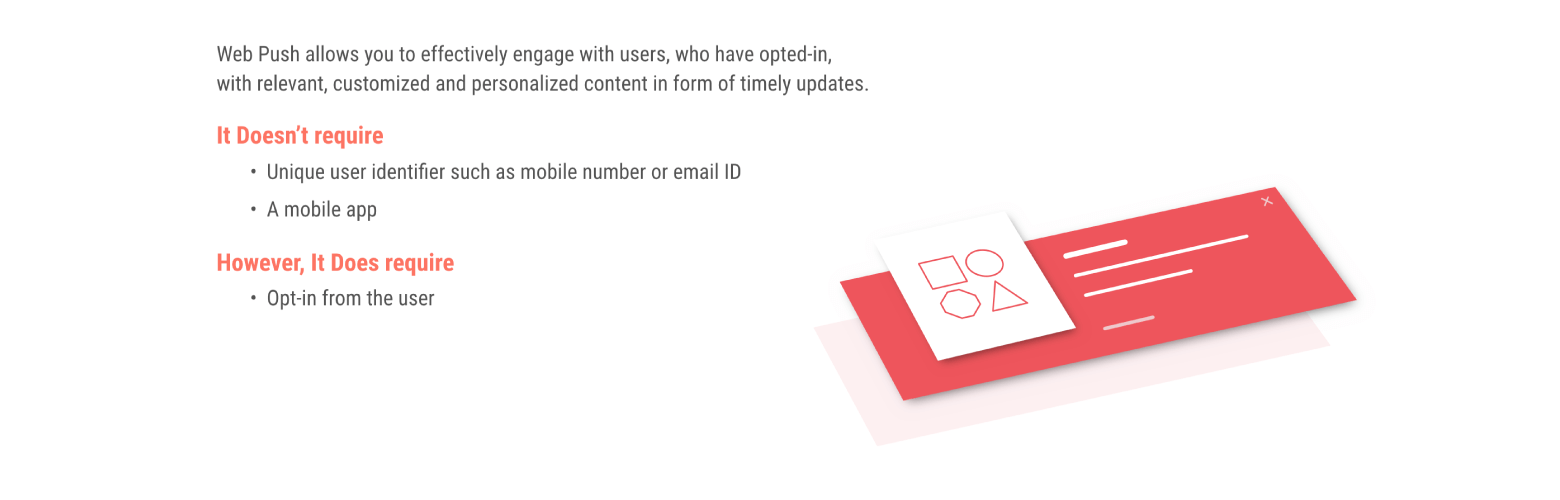
So, it’s a marketing engagement channel where you can engage with users who have opted in with some relevant message which you can personalize and customize to them and it does not require a mobile app, you don’t need to have a mobile app to reach these users on this push notification channel. You also don’t need their private credence, private identifiers like mobile number or email ID. But, it does require opt-ins from the user, and all of this is initiated from your website. That’s why it’s called web push notifications, you can watch the webinar, the video of the previous webinar by clicking on this link here on the slide. So, you can just go through that and get to know the basics.
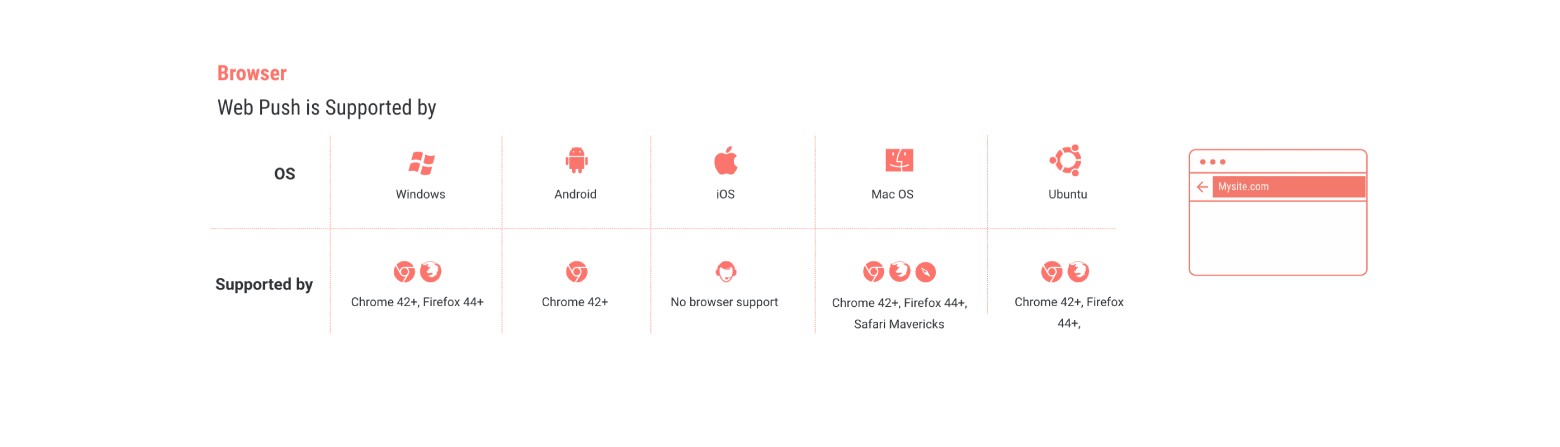
So, we’ll start with how a web push works, so that you get to know the competence and the terms that are in play and when you come to actually configuring this web push on WebEngage dashboard, you get a good idea about the terms that are there or the competence that are in the play. Now, since we are talking about web push, we need to talk about browsers and we need to talk about browser support. So, this slide shows all those browsers and OS combinations which currently support web push. So this is a recent innovation and the latest versions of these browsers support web push. Now, Safari does support push notifications. But, the way it does it, it uses a propriety push protocol instead of the more widely supported web push standard which Chrome and Firefox are supporting, And, so we’ll not be talking about Safari push notifications in this webinar. But, one thing also to note is that, all of these browsers, Chrome and Firefox, these, they don’t support sending push notifications, or subscribing to push notifications in private browsing mode or incognito mode that’s what’s called in Chrome.

So, here’s a term that may be new to you guys, it’s called Service Worker. So, what is Service Worker? It’s a JavaScript program, it’s a JavaScript which your site registers on the browser, And, once it’s registered, it keeps running on the browser even when the website is not open. So, this is the core technology behind web push. So, this is something that makes web push possible because even though your site is not open, this part of your site or this program from your site, keeps running and is able to show notifications on your site’s behalf, and, this program has other capabilities as well. So it’s also a core tech behind progressive web apps and other new features. The thing is that people normally ask,
Why is Web Push Only Supported on HTTPS Sites?
This is the reason, service workers only are supported on HTTPS sites because of some security reasons. They are only supported on HTTPS sites and consonantly, your web push notifications are only supported on HTTPS sites.

Another component, so once the browser is registered, your service worker is registered on the browser, the other component that comes to play doing subscription is a push service. So a push service is a back-end system that you have for each of these browsers. So there is Firebase Cloud Messaging for Chrome, and Mozilla Push Service for Firefox. These are push services that your browser connect to and they remain connected to these push services while they’re running.
Firebase Cloud Messaging was previously known as Google Cloud Messaging which was also used for mobile push notifications.
Once your site is loaded and is ready to show, is thus ready to ask the user for permission to show notifications, you can prompt the user, you can ask the browser to show that prompt and a prompt, it looks like this on this slide,

“mysite.com wants to show notification,”. So, this prompt is applicable for the full domain name. So, if you have a domain called www.mysite.com, that prompt will only be applicable, the permission that the user gives is only applicable to that domain, the full domain, www.mysite.com. It does not work or does not apply for other of your subdomains like, log.mysite.com will not be affected or the permission will not be affected by user granting permission on www.mysite.com.
And, the other thing to know is, if the user selects block on the prompt, they will never be shown the prompt again unless the user digs it up, digs it or resets the setting from inside Chrome’s settings. Chrome’s or Firefox settings. And here is what happens when the user clicks on allow. So, your script or your website comes to know that the user is allowed to subscribe to the push service and then receive notifications. So, your site connects or your site asks the browser to subscribe, and the browser in turn, asks the push service to start the subscription process. During subscription on Chrome, this file called manifest.json, it’s a series called manifest.json is required.
It contains the FCN or previously as it was called DCN, sender ID, or the project number, okay. It contains that piece of credential. So, this request is sent to the push service to complete the subscription process, and the push service in turn, returns a subscription object. A subscription object is an object which contains a URL that uniquely identifies the browser and the device. And, the browser, once it receives a subscription, generates a pair of encryption keys and it provides that subscription object and create subscription object to your site. The encryption keys are generated so that end-to-end encryption is possible. So, any message that your application back-end sends to the end user cannot be decrypted or deciphered by the systems in between mainly the push service, it cannot read the contents of the message that you send.
Now, once the site receives the subscriptions from the browser, it can then send that subscription, the subscription object to its own back-end. Or, if you’re using some vendor such as WebEngage, you can send it… WebEngage can collect the subscription itself and send it to its own back-end. This was a subscription process.
Now moving on to how it works while sending web push. So this component, that is highlighted, the circle below is called applicant sender. It’s where your push message originates. It’s a service, it’s a sender, it’s a system that prepares the push message and requests the push service to deliver it to the end user’s browser. So, applicant sender starts sending the encrypted message, so it has to encrypt the message with the encryption keys that are present in the subscription object, and the encrypted message is sent to the push service. On the URL that is also present in the subscription object. The push service, once it receives the message, it forwards it to the right device and once that is done…once that is received by the browser, it wakes up the service worker, the relevant service worker of your site.
Once service worker receives the message, it can act based on it. Most probably, it will just show off the notification and once the notification is clicked, it will open up a CTA. Mostly, it’s like the opening of a page. That’s how it works across the board like, every system that sends web push, or every site that takes in subscriptions, it works like that.
Now, coming on to how you’ll get started, how you can get started with WebEngage.
So, you have… Before you even begin, you have to first, integrate our SDK, WebEngage SDK on your site, the website SDK.
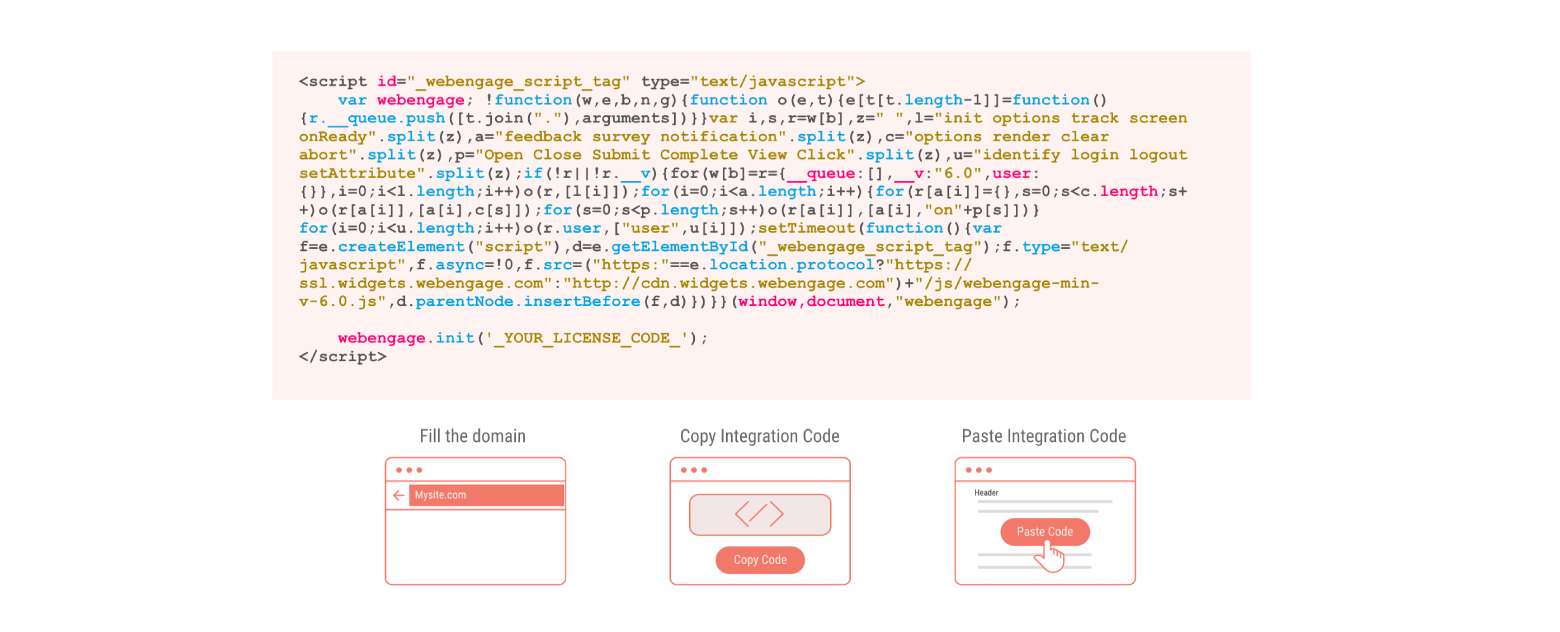
So, first take…go to our dashboard and fill in your domain name, and you’re presented with a snippet, a code snippet. I’ll just show you.
So, here’s a screen where you configure the domain. So, I’ve already put my site’s domain, and I submit, and I present it with this snippet of code. Take the snippet and place it on your site’s marker. Once that is done, the integration is complete, the website integration is complete. With that, you also have enabled our other engagement channels, onsite engagement channels such as notification service and feedback. Now, you have to make an important decision here, the opt-in method. So, as I said earlier, so web push requires the user to specifically, opt-in to receiving notifications.
So, since service worker and consequently the web push notifications only work on sites that support HTTPS, there are two opt-in methods possible.
The first is two-step opt-in, and second is one-step opt-in. I’ll go into details.
Two-step opt-in method is where…is a workaround actually you take the subscription on a WebEngage manage site. So, if your site does not support HTTPS, you can rely on this method. And, where the subscription is actually taken on a WebEngage manage site. Like, your site name dot webengagepush dot com. And notifications will appear to come from your site name, dot webengagepush dot com. That’s a disadvantage of this opt-in method. Before you even start using this, you have to decide what your site name is. It maybe, is something relevant to your branding. And, this method is easiest to get started with. You just configure or you fill in some details and that’s it. You just enable it and it starts right from there.
So, here we show the flow
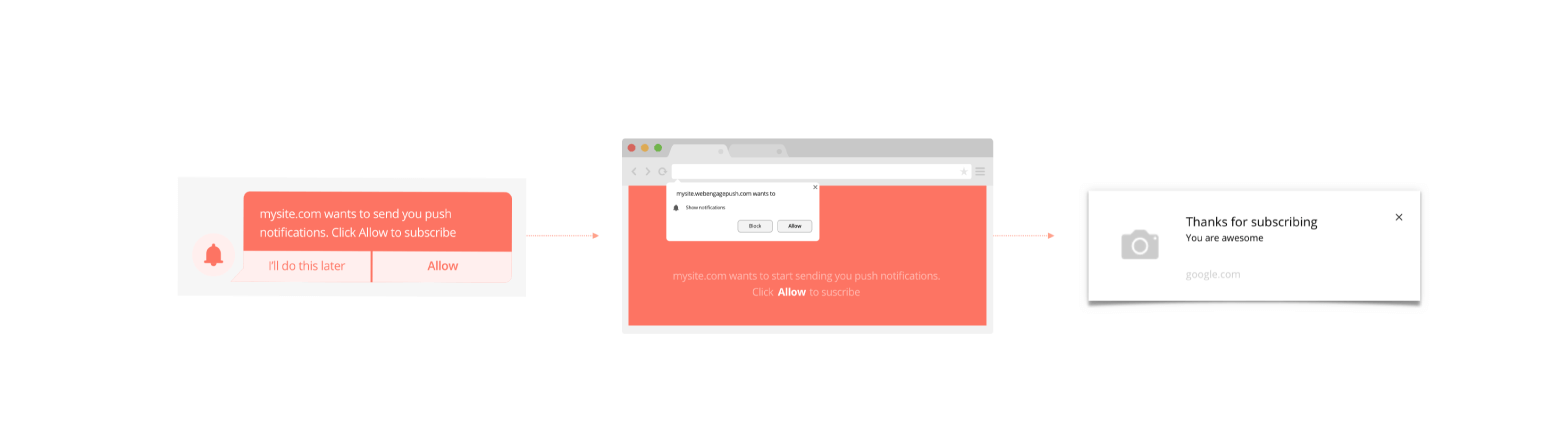
So, your site, on your site, we show a pop-up in some corner of the site where the user can click on allow and once the user clicks on allow, a pop-up opens. A pop-up window opens where the actual subscription happens, the browser prompt is shown where the user can allow, and once the user allows, we show some acknowledgement message that the user is now subscribed.
Coming to one step opt-in method, this is where the native browser permission request is directly shown on your site directly. So, the first pop-up that appears on the site is not really needed. Web Push notifications also are seen as coming from your own site. And this is the best experience for a user, it’s less intrusive because a user can block to never ever see that prompt again. And the disadvantage of this is, it works only on HTTPS sites. So, if this… If you want to go with this opt-in method, your site has to be completely on HTTPS. The good thing about this is that, this method shows us that a lot of people, their opt-in dates are higher in this method compared to the two-step opt-in method.
Now, which is the better option for you? To answer that, you can consider these three questions,
1. Is your website entirely on HTTPS?
If it is, or we’re talking about entirely, like, if some portions of your site is on HTTPS and only the login page is on HTTPS, then it won’t work. Second question you have to answer is,
2. Do you have developer access to your website?
Can you upload files to the server and have them available or accessible from the outside world? If your site is hosted on platforms like Shopify or wordpress.com, you don’t have developer access.
3. Can you spare time and developers for the initial setup effort?
If you have people working or the web developers who can spare time for the…there’s some effort required, a bunch of files to be uploaded to your server if you can spare time. If you cannot spare time, then you can only go with two-step opt-ins. So, if any of the three questions, if they come out negative for you, then your only option is two-step opt-in. Otherwise, we recommend that you move with one-step opt-in.
Now, we’ll go in detail in how you have to configure two-step opt-ins. So, this is a page, this is a dashboard screen where you configure all the settings. So, I’ll just move you to the dashboard.
So, once I’ve configured, now I can move on to configuring web push, which is available from the integrations dropdown under channel, and the web push tab. The initial screen is… So you have to start using web push, you just click on this toggle and it auto fills some settings for you. Like your…this is, initially, it sets up in a two-step opt-in mode and it is automatically filled in your site’s name or main name as the domain, the subdomain name for our own-managed site. And then you can upload an application icon, an icon which can show up along with the push notification or on the first pop-up that appears on the site. So this is the basic configuration, the bare minimum that you need to do.
The next is, you can design the opt-in pop-up that comes on your site. That’s on this tab, opt-in notification tab. So this is where you can change the text, change the position where it appears, bottom right, or top right, or top left and the color, the background color of the pop-up to make it seem part of your site and the text color. You can also change the labels of the buttons. So this is how you configure or design the pop-up that appears on your own site.
The next is, to design the pop-up window that appears, you can change a bit about that. You can change the text and the background color, that’s over on the opt-in window tab. You can change the text and the background colors. And you can also upload a bigger logo. This not the icon that I was talking about, you can upload a bigger logo for this pop-up window. That’s how you get started with two-step opt-ins. That’s about it. Once you save the configuration, it will just ask you whether, how you can verify the settings and whether we can start showing the pop-up on your site. Once you click it, it’s enabled. And now, the pop-up will start appearing on your site and users can subscribe.
Now, coming to one-step opt-in method, as I said, it requires some effort from your developers and some developer access needed on your web server. Before you start, you’ll need to create an FCN project on the Firebase console. So you just create a project, put in a name. While it gets created, we’ll just move on to the next slide. Yeah. It got created. So once you have done this, created the project, you can now go to project settings and the cloud messaging tab, you get a bunch of credentials, the sender ID, and the server key are what we are looking for. Copy those, note them down, and they’ll be useful later. Now, you have to create two files, one you name manifest.json. The format of this file is something like this.
Under your FCN sender ID, you place the sender ID you just noted down from Firebase. That’s the series of digits, and you create another file which is serviceworker.gs, just put this one line in there, and then upload them to the root of your web server such that they are publicly accessible as these two URLs. Once you have uploaded the files, you put this link tag in every page under the head section.
This will point the browsers to the correct location of manifest.json.
Now, once your server changes are done, you can come on to our dashboard. So, initially, your web push configuration on WebEngage will be in two-step mode. You can switch to one-step by clicking on this check box, just click okay. And then you’re presented with the configuration for one-step opt-ins. The serviceworker path is usually this as we have uploaded as the same name, the same path. As with two-step opt-in, you can upload the icon for your push notifications and then the server key that you noted down from FCN console, just paste it over here. That’s the series of alphanumeric string…characters. Just paste it down over here. Once that is done, click on save and your web push subscription is enabled using one-step opt-in.
Coming to other options that we provide, we provide targeting, where and when the prompt should show up. You can reset the prompt to certain pages, you can specify rules on the page URL, and based on those rules, we show the prompt. Or, you can choose to show it on every other page. You can limit the number of times the prompt shows up in a session like, you can say 10 or 5 or something, which is appropriate for you. You can also delay the prompt for say, five seconds after page delay of page load. You have to delay the prompt till five seconds after page load. Or, if the user has scrolled a certain percentage of the screen, or until a custom event is fired. Something like an added to wishlist. So you can show the prompt when the user adds something to a wishlist so that you can ask them to subscribe to the notifications to get updates on that item.
Acknowledgements are other options that we provide. Once the user subscribes in, the user is shown an acknowledgement message. Something like, “Thanks for subscribing” and some other description that you would want to put in with that message. It’s like a push notification that you want to show the user once he subscribes.
You can customize the icon, the title, and the body of the acknowledgment message. Or, if it does not suit your need, you can even disable it altogether. That’s it about setting up subscriptions on WebEngage.
I will come to how do you send web push notifications via WebEngage.
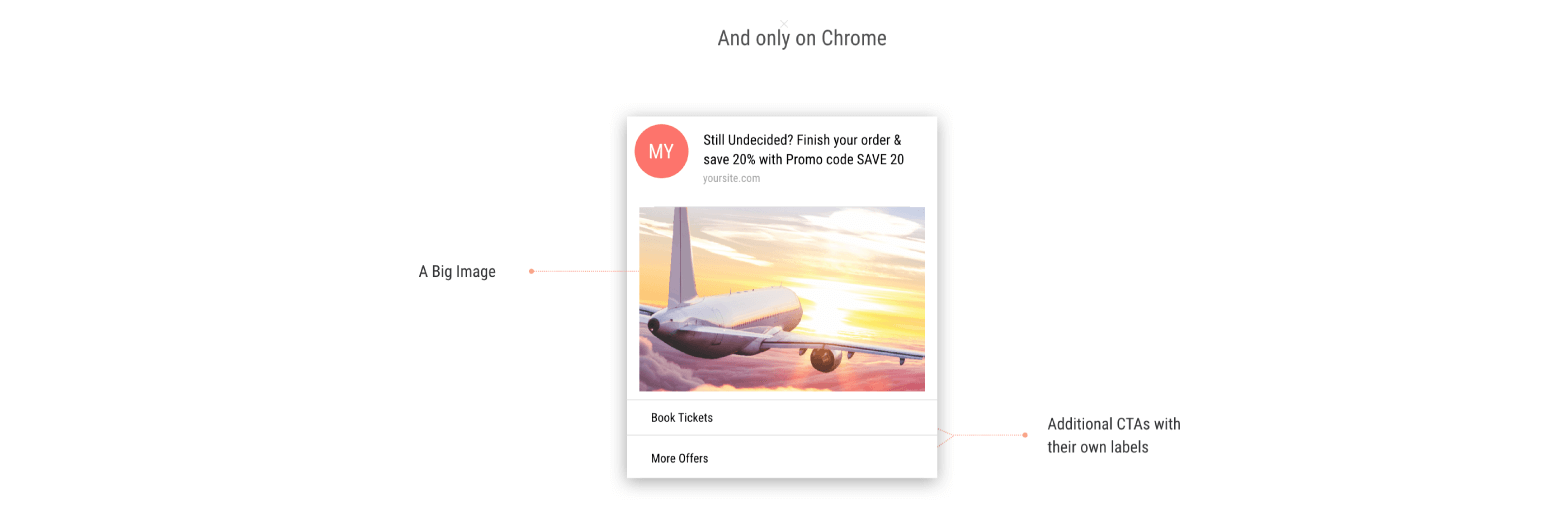
So, lets look at the various items that a web push notification can have? These are:
It can have an icon, you can define an icon for every notification, you can specify the title, you can specify the description, and you can of course, specify a click to action, which is a page URL which opens up when the user clicks on the notification. And this is only on Chrome. You can also have a big image that comes out below your description and a set of two CTAs, additional CTAs with their own labels.
And I will just show you how do you create a web push notification on dashboard, on WebEngage dashboard. So come on to the web push screen, click on plus to add a push notification. Just enter the title, moving on to the description. And, you know, all those fees, you also have the option of personalization. So this is a free account that’s why the personalization option does not come up. But, in a paid account, it will appear.
You can specify the page URL which opens up when the user clicks on the notification, and you can specify the icon for all that specific noted campaign. Moving on… You also have an option… So I’ll just upload an icon, any dummy image as an icon for now, and then we get to see the advanced options. So this is the setting which is only available on Chrome. So once the user gets to see the notification, the user…normally, the notification disappears up to 20 seconds. You can choose to keep it intact until the user clicks or dismisses it. That’s how you configure or design your push notification.
Coming to targeting options, we provide you with capabilities to target or filter out users where only those users who have done…who have been inactive in the last 48 hours, you send it to them. So this feature is via segments.
You can specify the relevant audience using segments. And you can also specify when to send. So you choose the segment over here, and you choose when to show this. So you can send it right away as soon as you activate this campaign, you can choose to send it right away or you can choose to send it on a later date. You can even choose to make it recurring, send it on a weekly, daily basis at certain times and you can specify the start and end times of this campaign.
You can also specify to show this notification on a per user basis when the user does some action. So that’s how you can decide on whom to send the notification and when to send the notification. Now, we also provide you controls on when not to send the notification, and also when the notification should expire if the user does not receive notification in a certain time. The notification will be dropped and the user will not get to see the notification. That’s on the same page, on the same screen.
Below, you get some options of frequency gapping is there, you can specify weekly limits for user, daily limits for user, or monthly limits for the same user. You can specify whether the user is supposed to be not shown or sent a notification on certain hours of the day, or if the user has blocked it, then you don’t send it at all. Or, you can queue it. If the user is not supposed to receive the notification at that time, you can queue it for a certain time. If the user is not available online at the same time, normally the push services, keep it in the air buffers for a certain delay, for a certain time. For example, here we have mentioned that, keep it alive for two days. So if the user comes back within that two-day period, the user will be able to see the notification. You can reduce this down to whatever period the campaign should be for. That’s how you specify web push notification expiry.
Here’s some best practices to keep in mind while designing push notifications, web push notifications. Keep the title and body under 40 and 120 characters respectively. So, the title should be under 40 characters, and the body, the description, should be under 120 characters. This is because the notification themselves do not have much width and usually, the text gets trimmed if they exceed these limits. And, whenever possible, you should send a contextual or personalized notification for a relevant engagement.

You can use web push notifications within journeys. So this is an example on how you can smartly use web push notifications in a journey. You have to engage with the user. It doesn’t matter to you what channel they use. So what we have done here is, we first checked whether the user is reachable on web push. If we find that the user is available, we engage with the user on web push. That’s because sending an email may be costly. It charges…it has a cost that the ESP deduces.
Why would you choose WebEngage for sending out web push notifications?
There are a couple of reasons. So, you can control where and when the opt-in prompt shows up,
- You can choose on which pages based upon the page rules, the notification prompt should come up, and when the prompt should come up.
- You can send the campaign to the relevant audience using segments
- You can personalize the same notification with the user and even attributes, or even feed some detail from an external API from your system.
- You can send the notification in response to user actions, say added to call, or added to wishlist, or send it on a recurring basis on a schedule. As I said, on a daily, or a weekly basis.
- You can also enforce DND, frequency capping, and message expiry.
- You can engage with the web push notifications in complex marketing workflows like we just saw
- we also provide you analytics out of the box. Analytics like conversion measurement, channel performance etc.
Web Push – Question & Answer Section
Avantika: Thanks a lot Lithin. That’s it for today. We’ll now start the Q&A session. Satyam wants to know, “Is WebEngage compatible with Shopify and if not, what is the way out?”
Lithin: The answer to that is, WebEngage is compatible with Shopify. It’s just that it’s not possible to set up one-step opt-in with Shopify. So you have a way out, you can use two-step opt-ins.
Avantika: Sahaya, you missed the web push webinar and yeah, definitely we’ll forward you the recording as soon as it will be available. Another question is, “Does WebEngage take care of the customization part and leave only the creative part for the brand to take care?”
Lithin: Yeah, we do provide customization options. You can always choose the color, the text that you want on the prompt, the pop-up and of course in the campaigns.
.caption{display:none}